In the previous part of the guide we completed the triage phase, where we conducted an examination of the device’s graphical interface to identify potential threats. We identified a particular application that raised red flags as potentially malicious and we will now escalate the investigation to a more in-depth technical forensic analysis. The goal during this stage is to gather additional evidence that may confirm the device has been compromised and to conduct a detailed review of the specific application flagged as suspicious during triage.
Setting expectations & informed consent
Before beginning the forensic analysis, we will take time to clearly explain each step to the person at risk in simple, non-technical terms. This ensures they fully understand the process, including the types of private information that might be collected, such as SMS messages, apps installed, and temporary files, among others. The individual will have the opportunity to pause or stop the process at any time if they feel uncomfortable.
We will also outline our data handling and destruction procedures, reassuring them that their information will be securely protected. We’ll state that all data collected during the analysis will be retained only for the duration necessary to complete the investigation and will be securely deleted immediately afterward or within a defined timeframe if additional review is required.
Informed consent will be obtained to ensure they feel in control and comfortable about the entire process.
Forensic analysis: a three-stage process
As highlighted in the introduction, this guide focuses on consensual forensics from the perspective of civic society organizations. The forensic analysis is divided into three key phases: Laboratory setup, Data acquisition, and Forensic analysis per-se. This process utilizes two open-source tools, mvt and androiqf, which are among the few designed to approach forensics from a consensual with a CSO perspective.
Our focus will be on Android forensics, specifically using a Motorola G20 as a laboratory device that simulates the infected phone.
To follow along with this part of the guide, we recommend using a laboratory device or emulator. In the following section on App Analysis, we will demonstrate how to set up an emulator. Once set up, you can perform data acquisition on the emulator and use it for analysis. You can even infect the emulator with the same malware we are using as we provided in a zip file (password: infected).
1. Laboratory setup
Many of the following configurations depend on whether we are dealing with an iPhone or an Android device. For Android, the specific OS version, device model, and vendor will further influence the setup process.
Whenever analyzing a Android device, it’s crucial to identify the device model and OS version, as procedures may change slightly depending on the device’s model. It is important that subsequent instructions in this guide be properly adapted to that specific model.
a. Identify the device model and Android version
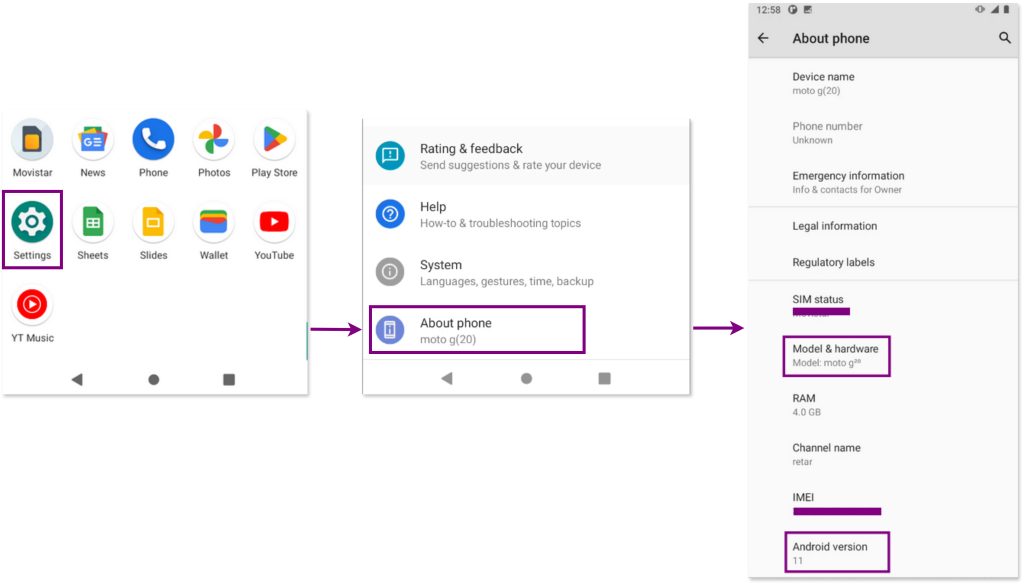
In this case, our laboratory is working with a Motorola G20 Android device, so the walkthrough will be tailored to that specific phone. To confirm this information, we navigated to Settings > About Phone and checked the Model & hardware and Android version sections. This confirmed that our lab device is a Motorola G20 running Android 11 as its operating system.

b. Enable Developer mode
To begin, we need to enable Developer Mode on the device to allow deeper access for analysis. The way of enabling may vary depending on the vendor and model of the phone, so we use the information gathered in the previous step to look for specific instructions online.
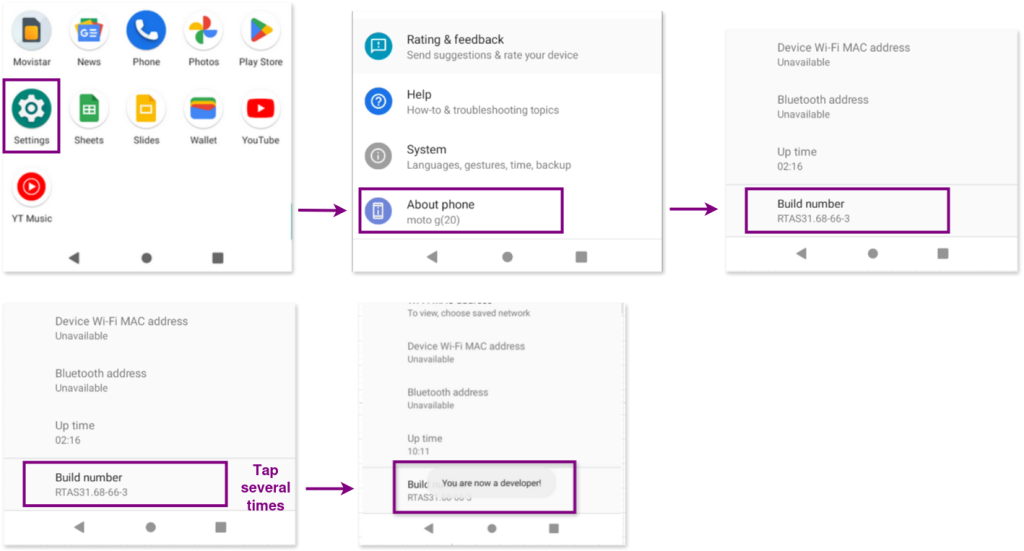
For a Motorola phone, this can be done by navigating to Settings > About Phone > Build Number and tapping the build number seven times. The device will then prompt for the PIN number, after which Developer Mode will be activated.

You can find instructions for enabling Developer Mode on Samsung, Pixel, and LG phones here, and for Xiaomi phones, the instructions are available here.
c. Enable USB debugging
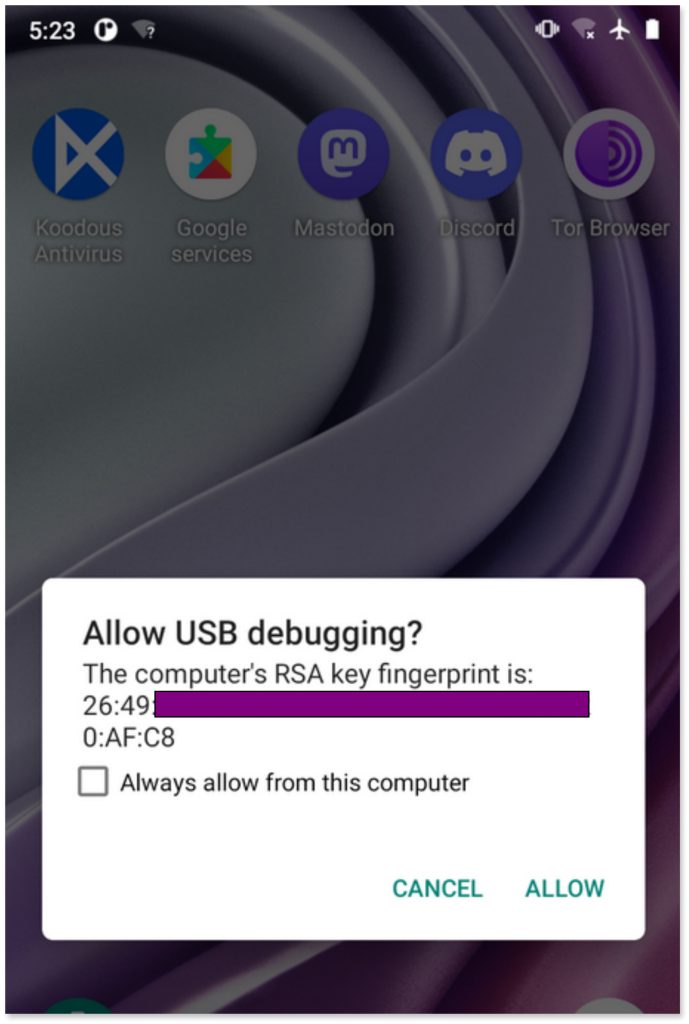
We are ready to connect the phone to analyze to our forensic workstation with a usb cable. When you do so, you’ll see a prompt asking to Allow USB debugging with the computer’s RSA key fingerprint. This security feature ensures that the computer to which the phone is connected is trusted. Select Allow to proceed with the analysis.

USB debugging option for the phone to enter debug mode when we connect it via USB to our forensic workstation.

We are ready to connect the phone to analyze to our forensic workstation with a usb cable. When you do so, you’ll see a prompt asking to Allow USB debugging with the computer’s RSA key fingerprint. This security feature ensures that the computer to which the phone is connected is trusted. Select Allow to proceed with the analysis.

d. Install Androidqf and mvt on our workstation
Our forensic workstation is a Linux machine running Debian, so we opted to download Androidqf for our system (androidqf_linux_amd64) from the official mvt GitHub repository. It’s important to always use the latest version, as this project is actively developed. While AndroidQF can also run on Windows and MacOS, it is advisable to use a GNU/Linux system for forensic work when possible because some of the tools we will use afterwards are only compatible with GNU/Linux.
[host]$ cd /path/to/androidqf

# Grant executable permissions. Note that the name may vary depending on the version.
[host]$ chmod + x ./androidqf_v1.7.0_linux_amd64

# To display the help menu
[host]$ ./androidqf_v1.7.0_linux_amd64 -h
To install mvt, follow the instructions provided in the official repository:
# To install
[host]$ pip3 install mvt

# To display the help menu for Android analysis
$ mvt-android -h
2. Data acquisition
In the data acquisition phase, we will collect the relevant data from the device for analysis. This process involves creating a snapshot of the device’s current state. On this data we will conduct the subsequent analysis, allowing us to detect signs of compromise in the device.
a. Available data sets for Acquisition
The acquisition phase involves choosing to collect among different sets of data, such as the bugreport or the backup from an Android device. Each data set, also known as “artifact”, contains different types of information from the device.
Depending on our initial questions, we can opt to acquire specific artifacts over others. For instance, if our focus is solely on analyzing potentially malicious links sent via SMS, we can choose to acquire just a backup from the device. However, if we aim to perform a comprehensive forensic analysis, we would opt to use AndroidQF for a more extensive acquisition. If in doubt, and you do not have constraints of time and space, it’s advisable to opt for an AndroidQF acquisition as it provides a more complete dataset for analysis, although it may take longer to complete and result in a larger file size.
A brief summary is provided below, organized from the most to least amount of information contained in each acquisition artifact:
| Acquisition artifact | Information contained | When to choose this |
|---|---|---|
| Androiqf output | Captures installed apps, temporary files, system state, information on system services and processes, security configurations, and other relevant info. This is the most comprehensive option, as it includes both a bugreport and a backup from the device. | Choose this when a forensic workstation is available to run AndroidQF and a thorough analysis is required. |
| Bugreport | Captures logs related to system state, CPU usage, memory usage, running services, and error reports. | Choose when a workstation is not available for connecting the phone, and data needs to be collected directly from the phone itself. |
| Backup | Captures SMS contents and their metadata. Previously included app data for backup, but this feature is now deprecated. | Exclusively used for checking SMS contents, such as potential phishing URLs. |
Remote acquisition:
If the assessment is being conducted remotely and we do not have direct access to the phone, our options are:
1. The device owner can create a bugreport directly on the phone and securely share the file with us for analysis.
2. The device owner can install AndroidQF on their computer (available for Windows, MacOS and Linux), and we can guide them through the acquisition process via a video call and to securely share the AndroidQF output with us.
The choice between these two options depends on factors such as time constraints, the availability of a computer, and the device owner’s comfort level with technology. Additionally, in both cases a stable internet connection is essential for sharing the acquired data sample. Bare in mind, in the second option, the data might be larger and take more time to upload compared to just sharing the bugreport file.
Since we aim to conduct an in-depth analysis and have access to a lab setup with a workstation machine to connect to the phone via USB, we opt to acquire data using AndroidQF. This process involves connecting the device to a computer (the forensic workstation) and using AndroidQF, a command line tool to create a snapshot of the device.
b. Running AndroidQF
When you run AndroidQF, it will first display the path where the acquired sample will be saved, which will be represented by a unique identifier as a hash, made up of letters and numbers to easily distinguish it.

Next, the tool will prompt you with several questions. Below are the possible answers for navigating those questions in AndroidQF are the following:
- Would you like to take a backup of the device?
Options given are: “Only sms”, “Everything” or “No backup”. We choose “Everything,” which, despite being a deprecated feature for app backups, will still include SMS data.

At this point, go back to the phone and set up a password for the backup. Make sure to remember this password, as it will be required during the analysis phase.

- Would you like to download copies of all apps or only non-system ones?
We choose “All,” but opting not to download system apps would also be a valid choice if you need to reduce the size of the sample.

- Would you like to remove copies of apps signed with a trusted certificate to limit the size of the output folder?
We choose “Yes” to remove apps signed by trusted certificates. The list of trusted certificates can be found here.

Finally, the process will conclude with a message stating Press Enter to finish ..., and the acquired sample will be saved in the folder identified at the beginning, in this case: b0dbb2ca-47c0-4221-a3d6-a0b2a8ff6ec7

c. Disable developer mode in phone
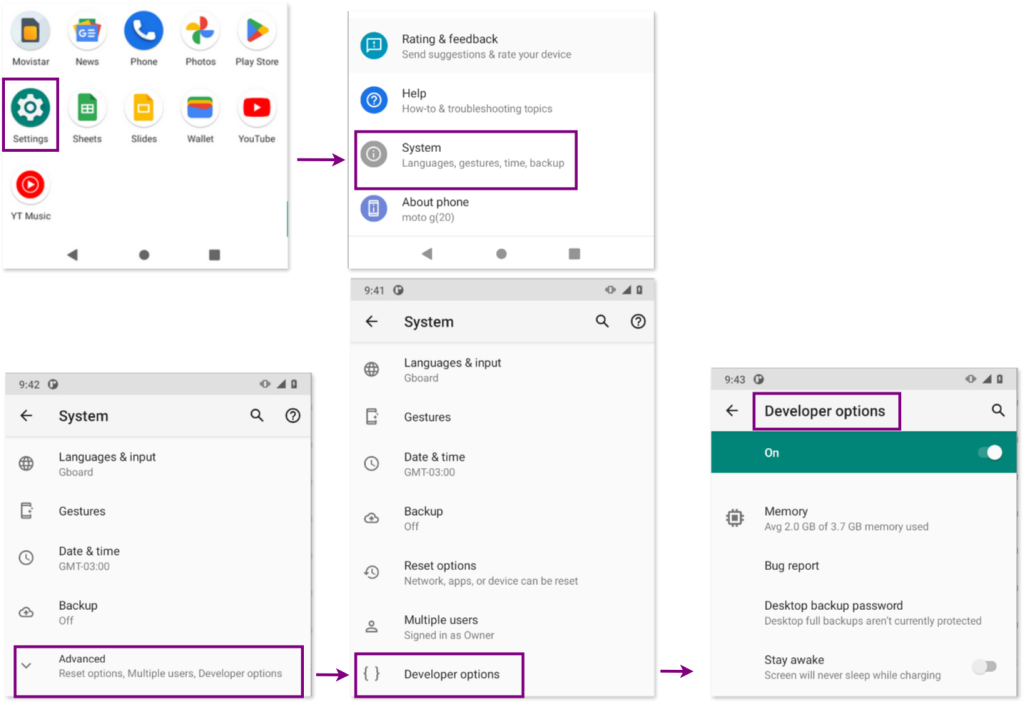
Once the acquisition is complete, disable Developer Mode on the phone by navigating to Settings > System > Advanced Options > Developer Mode.
3. Forensic analysis
We we will be using Mobile Verification Toolkit (mvt), an open-source tool designed to facilitate the forensic analysis of mobile devices, running Android and iOS. mvt is capable of performing a wide range of analyses, including examining installed applications, checking for suspicious settings, reviewing permissions, and matching against known Indicators of Compromise.
Indicators of Compromise or IOCs are pieces of evidence used to identify potentially malicious activity, such as a hash of a binary, a file name, a malicious domain or `ip` address or specific malicious behaviors.
a. Download IOC’s
The command mvt-android download-iocs is used to download the latest Indicators of Compromise (IOCs) available here.
$ mvt-android download-iocsb. Conduct the analysis with mvt
The command mvt-android check-androidqf will perform a detailed forensic analysis on the data acquired from an Android device using AndroidQF as shown above. And it will save the analysis results into the folder ./output given by the -o parameter.
$ mvt-android check-androidqf ./b0dbb2ca-47c0-4221-a3d6-a0b2a8ff6ec7/ -o /outputDuring the analysis, you may be prompted to enter the backup password in the command line to allow mvt to parse and analyze the backup data:

Once the analysis is complete, the logs of the analysis will be displayed in the command line and also saved in the command.log file within the mvt output directory (in our case inside ./output folder). This output contains various WARNINGS and INFO messages that are critical for further investigation.
WARNINGS in command.log file:
- Malicious app detected:
mvthas identified that the appcom.systemservicematches certain Indicators of Compromise associated with “TheTruthSpy,” a known malicious application.

This is a strong indicator that the device is infected with malicious software.
- Malicious settings detected:
mvthas flagged three potentially harmful settings that are currently enabled on the device.

These settings are present in the device and control various aspects of the device’s behavior and configuration.
a. accessibility_enabled = 1: accessibility services are enabled. Accessibility services are features that assist users with disabilities but can be misused by malicious apps. Therefore, while this isn’t inherently bad, it’s crucial to determine whether the user intentionally enabled this feature, as it can be exploited by malware.
b. package_verifier_user_consent = 1: Google Play Protect is disabled, confirming what was found during the initial triage. This is a significant security risk, as it leaves the device vulnerable and is a setting that malware often disables to avoid detection and removal.
c. install_non_market_apps = 1: this setting supposedly flags when a device allows apps to be installed from sources other than Google Play. However, this setting is often enabled by default on many Android devices even if untrusted installation is not allowed, so we consider this warning given by `mvt` as a false positive. We still need to figure out if apps can be installed via other non-trusted means. For more info on this see Sources of installation of apps below.
- Outdated security patch:
mvtalso warns that the device is not fully up to date, with the latest security patch applied in March 2023. While this is concerning, some vendors may no longer provide updates for the device, limiting the user’s ability to secure their phone. However, it is still important to flag this on our investigation.

INFO in command.log file:
- Device information:
mvtprovides details about the model and brand of the Android device being analyzed:

- App installation permissions: the analysis also reveals that the Chrome app is allowed to install applications on the device, in addition to the Google Play app. This is inline with our findings during triage phase and it is important because the malicious app could have been installed via a malicious website visited with Chrome browser. For more info on this see Sources of installation of apps below.

- Dangerous permissions:
mvtlists all apps requesting dangerous permissions, and notably, thecom.systemserviceapp is listed as requiring 14 potentially dangerous permissions. Additionally, other non-malicious apps are also listed, which require these permissions for legitimate purposes, such as receiving phone calls.

- Accessibility services:
mvtflags that thecom.systemserviceapp is actually the one utilizing Accessibility services, which is another significant red flag.

c. Further investigation steps:
The output from AndroidQF acquisitions and mvt log files is extensive, with numerous files containing important information we are not able to review due to space constrains. While the following files are particularly useful to review, it’s important to remember that the specific files you focus on may vary depending on the initial questions and objectives defined in previous phases.
Review the file timeline_detected.csv:
The file timeline_detected.csv inside mvt output folder contains key events flagged by mvt as malicious. For example, the entry shows that the package com.systemservice was installed and immediately granted access to the BIND_ACCESSIBILITY_SERVICE, which is often used by malicious apps to gain deeper control over the device. This timeline can provide valuable insights into the sequence of events.
"UTC Timestamp","Plugin","Event","Description"
"2024-09-07 12:00:13","DumpsysPackages","package_install","Install or update of package com.systemservice"
(...)
"2024-09-07 12:00:18.067000","DumpsysAppops","Access","com.systemservice access to BIND_ACCESSIBILITY_SERVICE: Access"
Investigating the file dumpsys_packages_detected.json :
The file dumpsys_packages_detected.json inside mvt output folder provides a detailed overview of
specific apps that have been flagged as malicious by mvt. This file contains information about the
identified apps, including their installation details, permissions, and any indicators of compromise that
were detected. Here is a snippet of code showing part of the file’s content:
"package_name": "com.systemservice",
"uid": "10154",
"version_name": "23.24",
"version_code": "11 minSdk=21 targetSdk=33",
"timestamp": "2024-09-07 12:00:13",
// Installation Details:
"first_install_time": "2024-09-07 12:00:17",
"last_update_time": "2024-09-07 12:00:17",
// Lists all the permissions requested by the app and whether they were granted:
"permissions": [
    {
        "name": "android.permission.READ_SMS",
        "granted": true,
        "type": "runtime"
    },
    {
        "name": "android.permission.CAMERA",
        "granted": true,
        "type": "runtime"
    },
    {
        "name": "android.permission.RECORD_AUDIO",
        "granted": true,
        "type": "runtime"
    },
    {
        "name": "android.permission.READ_CONTACTS",
        "granted": true,
        "type": "runtime"
    },
    {
        "name": "android.permission.ACCESS_BACKGROUND_LOCATION",
        "granted": false,
        "type": "runtime"
    }
],
"requested_permissions": [],
// Matched known Indicators of Compromise (IOCs)
"matched_indicator": {
    "value": "com.systemservice",
    "type": "app_ids",
    "name": "TheTruthSpy",
    "stix2_file_name": "raw.githubusercontent.com_AssoEchap_stalkerware-indicators_master_generated_stalkerware.stix2"
}
Investigating sources of installation of apps
While installing apps from sources other than Google Play Store can introduce security risks, it’s not necessarily problematic. Some users may choose to use alternative app stores like F-Droid or Aurora Store to avoid relying on Google services. However, it’s crucial to be aware of where apps on the device are being installed from. For instance, installing an app via Chrome can present different risks compared to downloading it from the Google Play Store. Although Chrome is a trusted app, the apps it installs do not go through Google Play’s auditing process.
Although sometimes malware still make its way into official app stores, in most cases malicious apps often find it difficult to get approved and distributed through Google Play Store, so they are typically offered for download via a webpage instead. This is particularly interesting in our case, as we are dealing with an attacker who has physical access to the device, making it easier for them to install such apps directly from these malicious websites.
Therefore, when apps can be installed from sources like Chrome or the File Manager, it should be flagged during analysis because it a frequent way how malware use to bypass the usual security checks.
How can we check sources of installations? The output from AndroidQF provides detailed information about where apps were installed from, which can be found in the packages.json file.
To understand the sources of installation, we should focus on the installer field for each app that reveals how the app was installed:
"installer": "com.android.vending": this value indicates that the app was installed through the Google Play Store."installer": "null": this ambiguous value may suggest that the app came preinstalled by the vendor or was installed using the `adb install` command (a tool that will be explained in the section of the guide on Dynamic Analysis. To better assess its significance, it should be reviewed alongside thesystemandthird_partyfields. The system field indicates if an app is a pre-installed system app, while thethird_partyfield shows whether the app was installed later by a user or another source. If an app has"installer": "null","system": true, and"third_party": false, we can generally consider it safe as the app came pre-installed when buying the device."installer": "com.google.android.packageinstaller": this indicates that the app was installed via the Android Package Installer, typically meaning it was sideloaded from a source like a web browser (for example, Chrome) rather than from Google Play. This is significant because malicious apps often bypass Google Play’s security checks by being distributed through web pages or third-party apps.
Here is a snippet of code from packages.json file from AndroidQF output (in our case inside the folder ./b0dbb2ca-47c0-4221-a3d6-a0b2a8ff6ec7/), displaying those fields for the com.systemservice app:
    {
        "name": "com.systemservice",
        "files": [
            {
                "path": "/data/app/~~2gP3tkFQxPSK-huWEsulhA==/com.systemservice-2syr8eMwmOCmsJrXS8TKNQ==/base.apk",
                "local_name": "",
                "md5": "3b2bffa809e1332c8b77f91add1a7374",
                "sha1": "cf0489ae4122584fcc510ca1c6c93ba8c0405899",
                "sha256": "bff0087b9e9d47e64841c0fd32d89c521d1ff4065d695472c7c107ef620ac9ba",
                "sha512": "6a74cb476d094958b66b73501ccd961601d1bee0c2f86ef453ccde2dd9c2cf1c53437df8bfa6c1d64f212b27e6f8087b8d1d64ebda3d1582a6150513e2d98531",
                "error": "",
                "verified_certificate": true,
                "certificate": {
                    "Md5": "8a0e7cad615d56393d2b9a7d3b31b555",
                    "Sha1": "5e3c376b52c672c81439358de6348f25f96eaaa4",
                    "Sha256": "90be68b9a75663ab55bd3e724f3c0df7b106286d8c50f146192545d00e5f2f42",
                    "ValidFrom": "2024-03-21T02:36:22Z",
                    "ValidTo": "2049-03-15T02:36:22Z",
                    "Issuer": "CN=TheTruth",
                    "Subject": "CN=TheTruth",
                    "SignatureAlgorithm": "SHA256-RSA",
                    "SerialNumber": 1
                },
                "certificate_error": "",
                "trusted_certificate": false
            }
        ],
        // App installed from untrusted source
        "installer": "com.google.android.packageinstaller",
        "uid": 10154,
        "disabled": false,
        // Non-system app
        "system": false,
        // Third party app
        "third_party": true
    },
Copy of apps installed on the device
AndroidQF will save copies of the Android app binaries (files ending with .apk extension, which are the packaged installation files for Android apps) in the output folder located at ./b0dbb2ca-47c0-4221-a3d6-a0b2a8ff6ec7/apks/. By filtering for the malicious app name com.systemservice, you can identify and retrieve the malicious app’s .apk file stored on your host machine, which will be further analyzed in the next section.
d. VirusTotal check
With the hash information ("sha256": "bff0087b9e9d47e64841c0fd32d89c521d1ff4065d695472c7c107ef620ac9ba") provided by AndroidQF package.json file, we can visit the VirusTotal platform to see if any antivirus vendors have flagged it as malicious. VirusTotal aggregates results from multiple security vendors, helping to identify whether a file is potentially harmful.
Hash info of com.systemservice inside ./b0dbb2ca-47c0-4221-a3d6-a0b2a8ff6ec7/packages.json
{
        "name": "com.systemservice",
        "files": [
            {
                "path": "/data/app/~~2gP3tkFQxPSK-huWEsulhA==/com.systemservice-2syr8eMwmOCmsJrXS8TKNQ==/base.apk",
                "local_name": "",
                "md5": "3b2bffa809e1332c8b77f91add1a7374",
                "sha1": "cf0489ae4122584fcc510ca1c6c93ba8c0405899",
                "sha256": "bff0087b9e9d47e64841c0fd32d89c521d1ff4065d695472c7c107ef620ac9ba",
We search the hash of the app in VirusTotal:

According to VirusTotal, 29 out of 70 security vendors flagged this hash as associated with a malicious app.

Generally, if five or more antivirus engines flag an app as malware, it is likely that the detection is accurate and not a false positive.
Conclusion
In summary, the app com.systemservice was installed via Chrome, likely from a malicious website, as indicated by the installer com.google.android.packageinstaller. It is not a system app (system: false) and is categorized as a third-party app (third_party: true). The SHA256 hash of the APK ("sha256": "bff0087b9e9d47e64841c0fd32d89c521d1ff4065d695472c7c107ef620ac9ba") was flagged by VirusTotal as malicious by 29 out of 70 security vendors. Additionally, according to mvt the app name matches known Indicators of Compromise (IOCs) for TruthSpy, a known stalkerware, as also noted by VirusTotal.
These findings strongly suggest that com.systemservice could be the same app flagged as potentially malicious during the triage phase, where it was identified under the name Google Services. It appears to be a malicious app currently installed on the device, with dangerous permissions and malicious configurations enabled. Given these indicators, the app is an important candidate for further investigation to fully understand its capabilities and behavior. To achieve this, we can use the app’s binary (.apk file) that was downloaded by AndroidQF and perform both static and dynamic analysis, which will be explained in the next section.
Every case presents unique challenges and may require different analysis techniques and logs. In this specific case, the focus was on the mentioned logs. It’s also important to note that consensual forensics is an evolving field, with ongoing research exploring new artifacts and potential indicators that can be obtained using tools like AndroidQF and mvt. These tools are being developed by civic society organizations and activists, and they are open for the community to use and contribute to, ensuring they better address the unique needs and challenges.
This guide was created by tes and is shared under Creative Commons BY-NC-SA license; for any errors or enhancements, please share your feedback via email (`[email protected]`) or keybase (`https://keybase.io/texturas`)